
Paver Walkway Installation: How to Build Paths and Steps
A good paver walkway installation looks simple on paper. Lay some stones, sweep in sand, done. In practice, the work you can't see decides whether the path stays flat for 20 years or sinks and shifts after the first summer of heavy Florida rain. Most failures trace back to a thin base or poor drainage, not the pavers themselves.
Here is the short answer. Excavate 7 to 9 inches deep, compact 4 to 6 inches of gravel, add 1 inch of bedding sand, then lay, edge, and lock the pavers with polymeric sand. Paver steps follow the same logic, with a firm base and a consistent rise for each tread. In Central Florida's sandy soil, base compaction matters even more.
This guide walks you through each stage: planning the layout, digging, building the base, setting and cutting pavers, installing edge restraints, and finishing the joints. It also covers how to adapt the process for steps. At TWQ, we have built hardscapes across Sebring and nearby towns for over 20 years, so we'll also flag where a job is better left to a pro.
What you need before you start
Good prep saves you more time than any technique you use later. Before you break ground, gather every material and tool and confirm the site is safe to dig . Running out of base gravel halfway through a path is the most common reason a weekend project drags into a month.
Materials and tools
Measure the path length and width, then multiply to get square footage. A 3-foot-wide, 20-foot path is 60 square feet. Use that number for every order , and buy about 10% extra pavers for cuts and breakage.
| Item | What to buy | Rule of thumb |
|---|---|---|
| Pavers | Concrete or clay, 2 3/8 in (60 mm) thick for foot traffic | Add 10% for cuts |
| Base | Crushed gravel or limestone that compacts tight | 1 cubic yard covers about 81 sq ft at 4 in |
| Bedding sand | Coarse concrete sand, never play sand | 1 cubic yard covers about 324 sq ft at 1 in |
| Edge restraints | Plastic or aluminum with steel spikes | Both sides plus any ends |
| Joint sand | Polymeric sand | Check the bag for coverage by joint width |
Then collect the tools. Most are cheap, and the compactor is the only one worth renting.
- Plate compactor (rent for a day)
- Flat shovel, round shovel, rake, and wheelbarrow
- 4-foot level and tape measure
- Stakes, mason's string, and marking paint
- Two 1-inch pipes and a straight 2x4 for screeding
- Rubber mallet
- Masonry saw or angle grinder with a diamond blade
- Safety glasses, hearing protection, and a dust mask
Planning paver steps installation too? Add bullnose or cap pavers, extra block for the risers, and a tube of masonry adhesive to the list now.
Site checks before you dig
Call 811 at least two full business days before you dig. Buried gas, electric, and irrigation lines can sit only a few inches down, and hitting one turns a DIY project into an emergency. Mark your own sprinkler lines too, since the utility locate does not cover private irrigation.
Next, look at the rules and the water. Check your HOA covenants, and ask your city whether a permit is required for any walkway paver installation near the street, since a sidewalk paver installation in the public right-of-way often is. Then watch where rain runs during a storm. A path that traps standing water will heave and stain no matter how well you build it.
Your base, not your paver, decides how long the path lasts, so budget your time and money there first.
If the site has soft, soggy soil or a steep grade, plan for extra base depth or call a pro before you start digging.
Step 1. Plan and mark the walkway layout
Set the width, shape, and slope
Decide on width first. 36 inches is the minimum for a comfortable path, and 48 inches lets two people walk side by side. Then adjust the width to your paver size so you make fewer cuts. A path built from 12-inch pavers, laid three across, needs no cuts on width at all.
Slope comes next. Water has to leave the path, so build in a fall of 1/8 to 1/4 inch per foot away from the house and foundation. On a 20-foot path, that means 2.5 to 5 inches of total drop. A dead-level walkway paver installation holds puddles, and puddles loosen joints.
Water that has nowhere to go will move your pavers, so plan the slope before you pick up a shovel.
Mark the layout on the ground
Transfer the plan to the site with stakes and string. This is where you catch awkward corners and surprise obstacles while they are still cheap to fix.
- Drive stakes at both ends and at every corner or direction change.
- Run mason's string between stakes and set it at the planned finished height.
- Paint the path edges on the ground. Mark 6 extra inches on each side for the edge restraints.
- For curves, lay out a garden hose, adjust it until the line looks smooth, then paint along it.
- Check that the string drops by your planned slope from the high end to the low end.
If your plan includes paver step installation, work out the numbers now. Measure the total drop from the upper grade to the lower one, then divide by a riser height of 4 to 7 inches to get the step count. Keep every riser identical and treads at least 11 inches deep . Uneven risers are a common trip hazard, and they are hard to fix after the pavers are down.
Step 2. Excavate and build the base
Dig to the right depth
Start by stripping sod and roots inside your painted lines. Then excavate 7 to 9 inches deep , following the slope you set with the string. Add up the layers to find your exact depth:
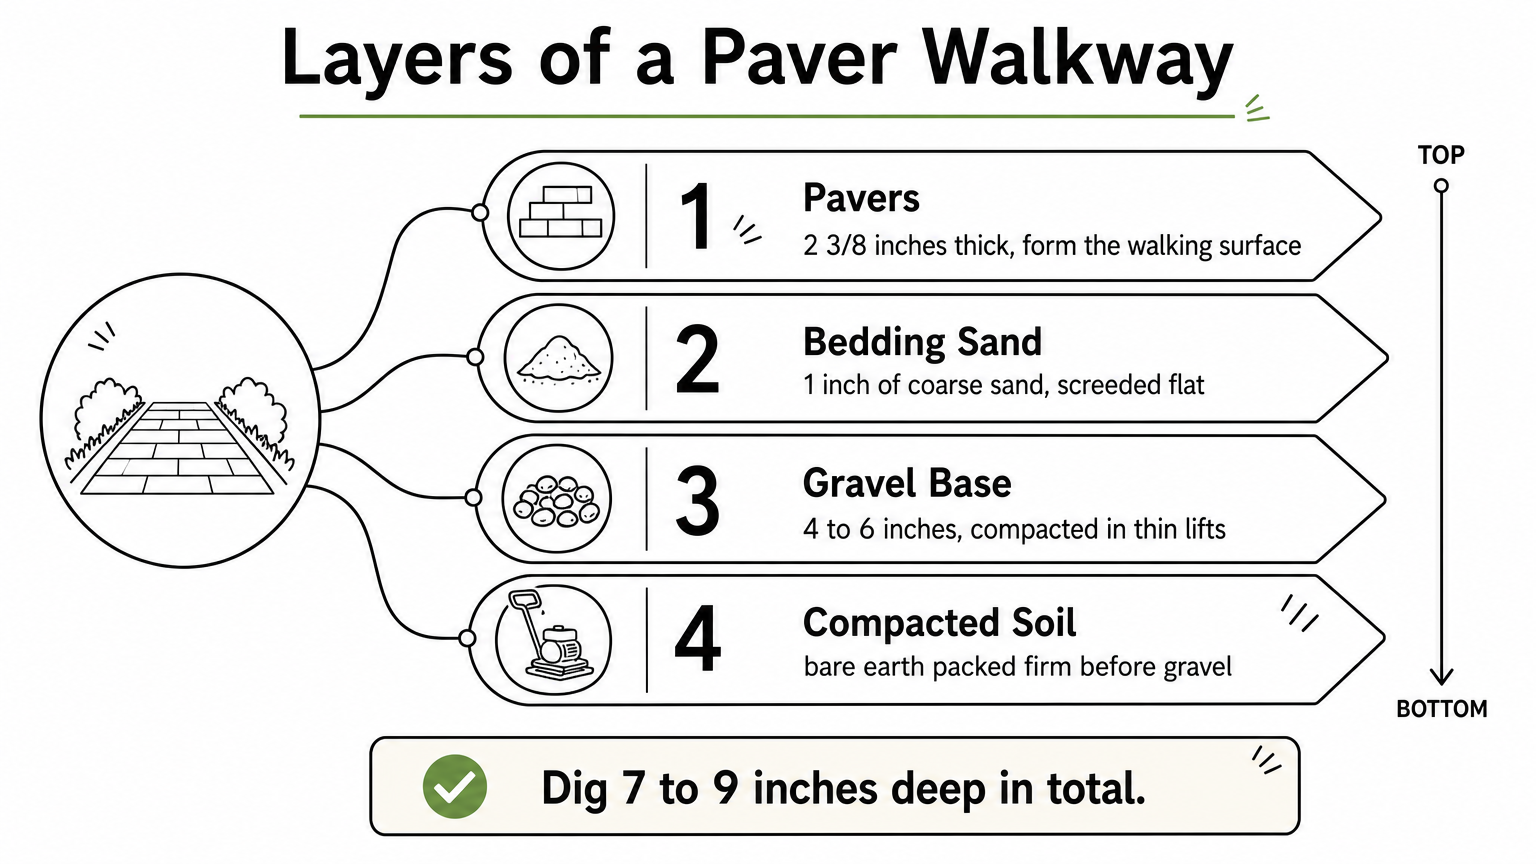
- Paver thickness: 2 3/8 inches
- Bedding sand: 1 inch
- Gravel base: 4 to 6 inches (go with 6 in soft or wet soil)
Dig the trench bottom to the slope, not flat. Measure down from the string at several points so the base keeps the same 1/8 to 1/4 inch per foot fall as the finished surface. Expect about 1.5 cubic yards of spoil from a 60-square-foot path, so line up a place to put it.
Compact the soil and build the gravel base
Before any gravel goes in, compact the bare soil with the plate compactor. Make two passes at right angles to each other. Central Florida's sandy soil shifts easily, so mist it lightly first. Dig out any soft spot and refill it with gravel.
Then build the base in layers:
- Spread gravel in lifts no thicker than 3 inches.
- Mist each lift and run the compactor over it at least twice.
- Repeat until the base is 4 to 6 inches thick.
- Check the depth against your string and rake out any low spots.
A base compacted in thin layers will outlast a thick one dumped in all at once.
When you finish, the surface should be firm and sloped with no loose stones. If a boot heel leaves a mark, compact it again. This is the stage that matters most for any walkway paver installation, so don't rush it.
Step 3. Set edging, screed sand and lay the pavers
Install the edge restraints
Set the edge restraints directly on the compacted gravel , along both sides of the path and right on your painted lines. Drive a steel spike through each hole, about every 12 inches. On curves, use flexible restraints and add a spike every 8 inches , because curves push outward the most.
Screed the bedding sand
Screeding gives you a flat, even sand bed at exactly 1 inch. Here is the sequence:
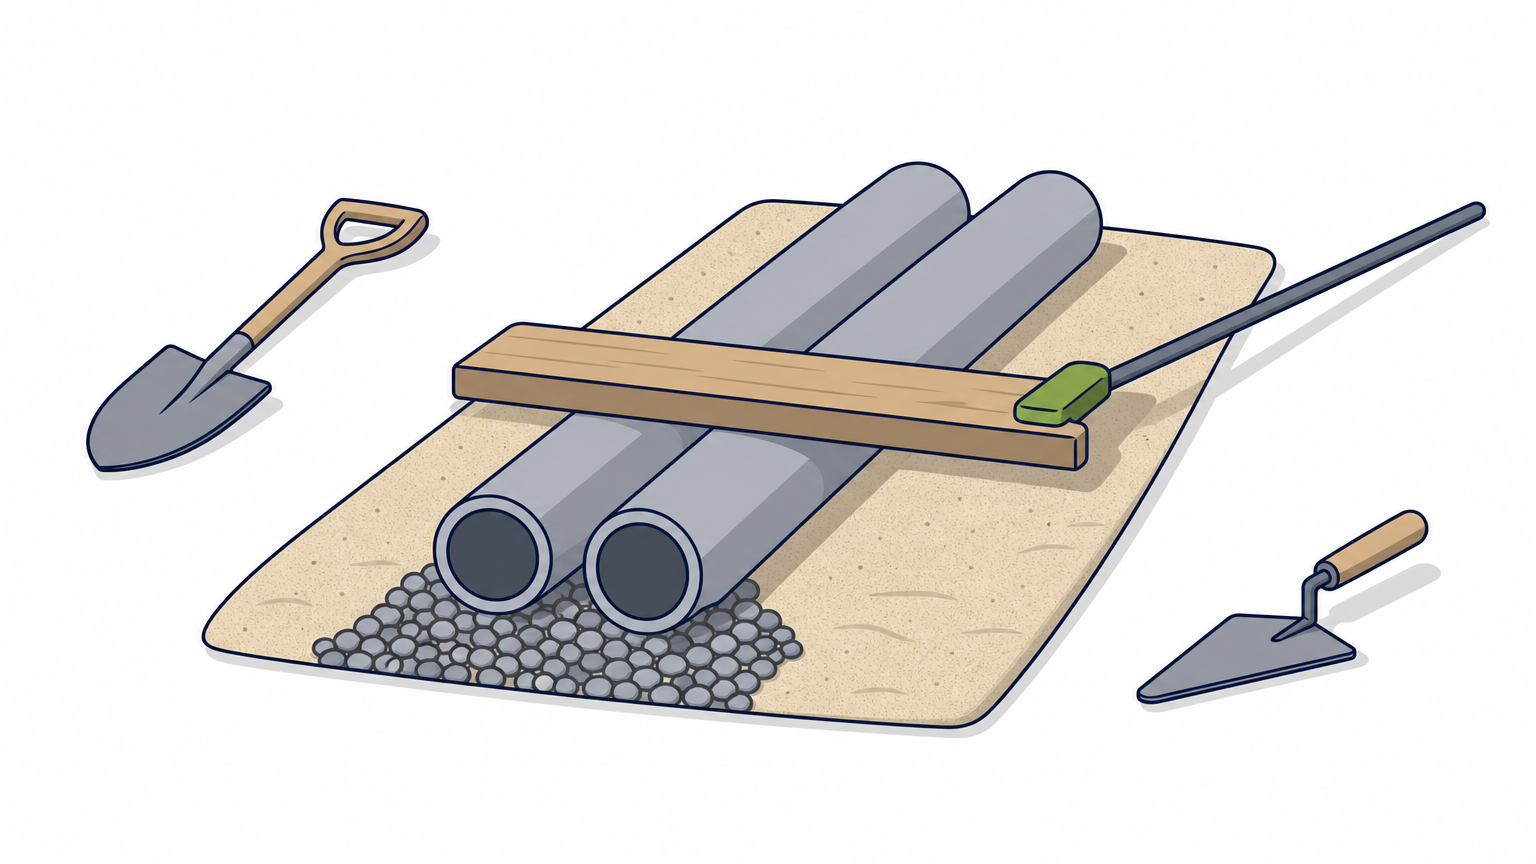
- Lay the two 1-inch pipes parallel on the gravel, running with the slope.
- Shovel coarse sand over and between them.
- Pull the 2x4 across the pipe tops in a sawing motion.
- Lift the pipes out and fill the grooves with sand, then smooth with a trowel.
Work in sections of about 5 feet, so the sand never sits exposed to rain before the pavers go on. Never compact the sand and never step on it after screeding. Kneel on a plywood board when you reach over finished sections.
Screed the sand once, then keep your feet off it.
Lay and cut the pavers
Begin at a fixed edge, such as the house or a straight corner, and place each paver straight down , not slid into place. Sliding pushes sand up between the joints. Keep joints around 1/8 inch, and check your string every few rows so the pattern stays square.
Save the cuts for last. Mark each piece, then cut it with a masonry saw or an angle grinder and diamond blade, wearing your glasses, hearing protection, and dust mask . Once every paver is down, run the plate compactor over the surface with a rubber pad to seat them evenly. That finishes your walkway paver installation base work, and the joints come next.
Step 4. Build paver steps and finish the joints
Build the steps from the bottom up
Paver steps installation uses the same base logic as the path, just stacked. Start at the lowest step and work upward, one riser course at a time . Bury the first course so its top sits about an inch below the finished walkway, and set it on 6 inches of compacted gravel .
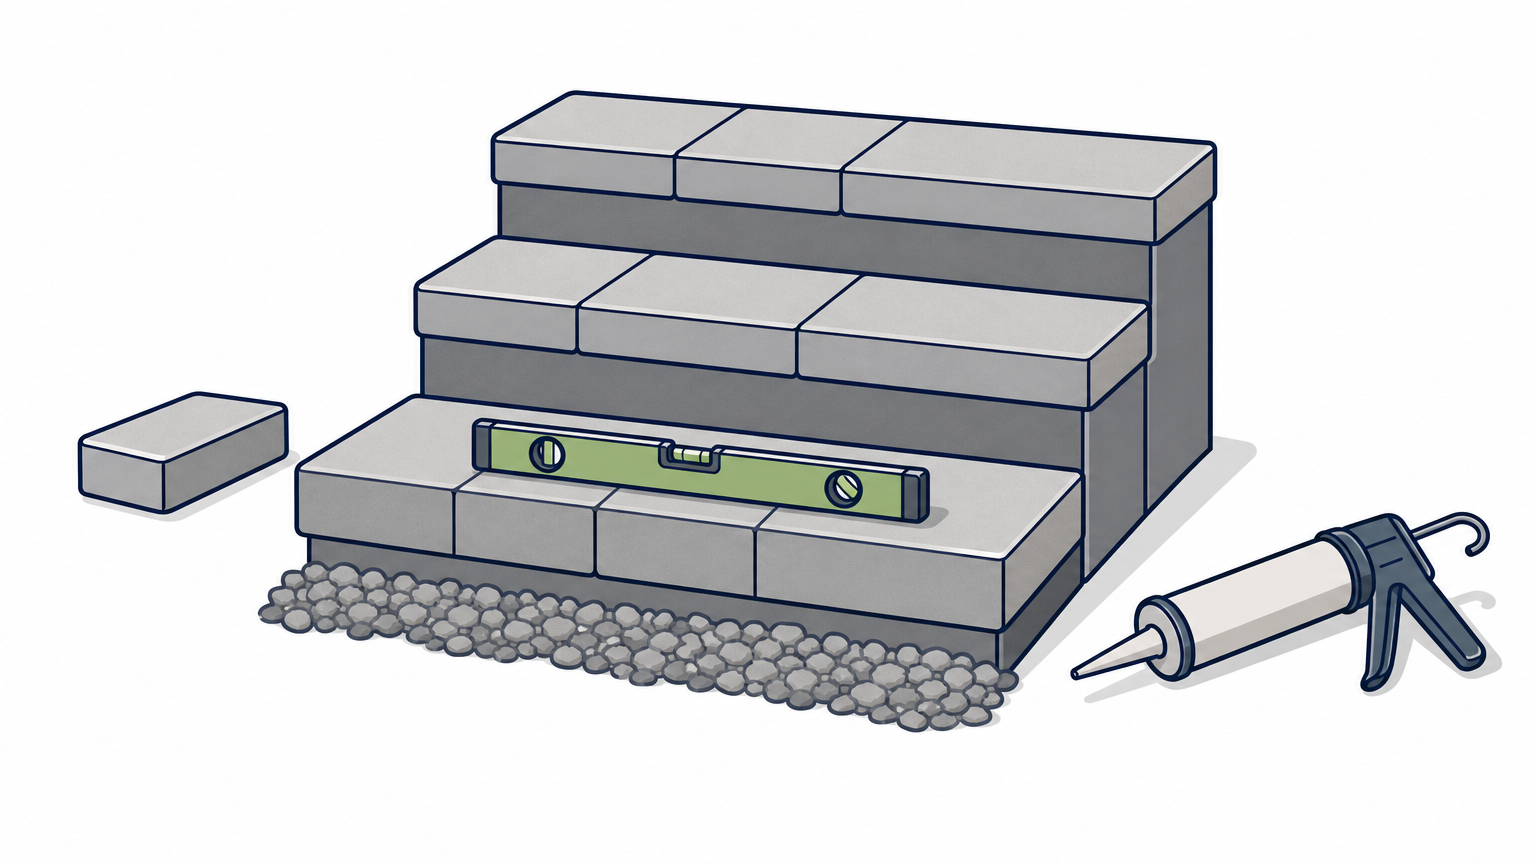
- Excavate the step footprint and compact the gravel base.
- Set the first riser course level side to side and front to back.
- Backfill behind it with gravel, compacted in 3-inch lifts.
- Glue each higher course with masonry adhesive, staggering the joints.
- Top each step with cap pavers that overhang the riser about 1 inch and slope 1/8 inch per foot forward.
Test every tread with the level before the adhesive sets, because a wobbly or backward-sloping tread is hard to fix later.
Lock the joints with polymeric sand
When all pavers are seated, make sure the surface and joints are completely dry . Then sweep polymeric sand across the path and steps until every joint is full to within 1/8 inch of the top.
- Run the compactor over the surface once more to settle the sand, then top off any low joints.
- Blow or broom every grain off the paver faces, since leftover sand leaves permanent haze.
- Mist lightly, following the bag's directions.
Polymeric sand only hardens right when the joints are dry going in and stay dry while it cures.
Skip the job if rain is forecast in the next 24 hours, which matters in Florida's summer storm season. Keep traffic off for 24 to 48 hours while the joints cure. Then walk it, and check that water drains off every step and the path.
Final tips for a path that lasts
A paver walkway installation succeeds or fails below the surface. Dig deep enough, compact the gravel in thin lifts, and hold a steady slope so water always has somewhere to go. Then set your edging firmly and let the polymeric sand cure dry before anyone walks on it. Steps follow the same rules, with identical risers and level treads.
Once the path is down, check it after the first few heavy rains . Top off any low joints and reset a sunken paver early, while it is a quick fix. Not every yard cooperates, though. With soft soil, a steep grade, or a long run of steps, bringing in a pro is a smart call, not a failure.
If you would rather hand off the digging, TWQ has built hardscapes around Sebring for over 20 years . Talk to TWQ about your paver walkway installation or steps and get a licensed, insured crew on the job.