
Paver Driveway Installation: DIY Steps from Base to Joints
Paver driveway installation follows one fixed sequence. Excavate about 12 inches, build an 8-inch base of compacted crushed stone in thin layers, screed a 1-inch bed of coarse sand, and lay vehicle-rated pavers. Then restrain every edge, compact the surface, and sweep in joint sand. Skip or rush any layer under the pavers and the surface will rut within a couple of seasons.
Most failed driveways were not ruined by a bad paver. They failed underneath. A car loads a surface far harder than patio furniture does, and Central Florida's summer downpours find every weak spot in a poorly built base. Many guides either stop at patio-level advice or assume you have a skid steer and a crew, which leaves you guessing about depth, material, and order of work.
This guide walks through the job in the order you do it: planning, excavation, subbase, bedding and laying, then edges and joints. TWQ installs paver driveways for homeowners in Sebring and nearby communities, so the depths and sequence below reflect how a professional driveway is built, with the figures you need to plan a DIY version.
Before you dig: planning, tools and DIY limits
A paver driveway is a heavy but achievable project if you plan the quantities, rent the right machines, and settle utilities, permits and drainage first. Doing that work before the first shovel goes in prevents most expensive mistakes.
Decide whether this is a DIY job
A 20 by 30 foot driveway means moving roughly 24 cubic yards of soil and bringing in more than 20 tons of stone. A small crew with a skid steer can finish that in a few days. Working alone with a wheelbarrow and a rented plate compactor, expect several weekends of hard labor.
Cost is the other factor. Published installed-cost estimates for paver driveways commonly run about $10 to $40 per square foot , depending on paver material. For 600 square feet that is $6,000 to $24,000 . DIY saves labor, not materials. Pavers usually cost more up front than poured concrete, but you can lift and replace a single damaged paver, while a cracked slab has to be cut out. If you would rather hand the work off, TWQ offers a free estimate after an on-site walkthrough.
Plan, permits and utilities
Work through this checklist before you rent anything:
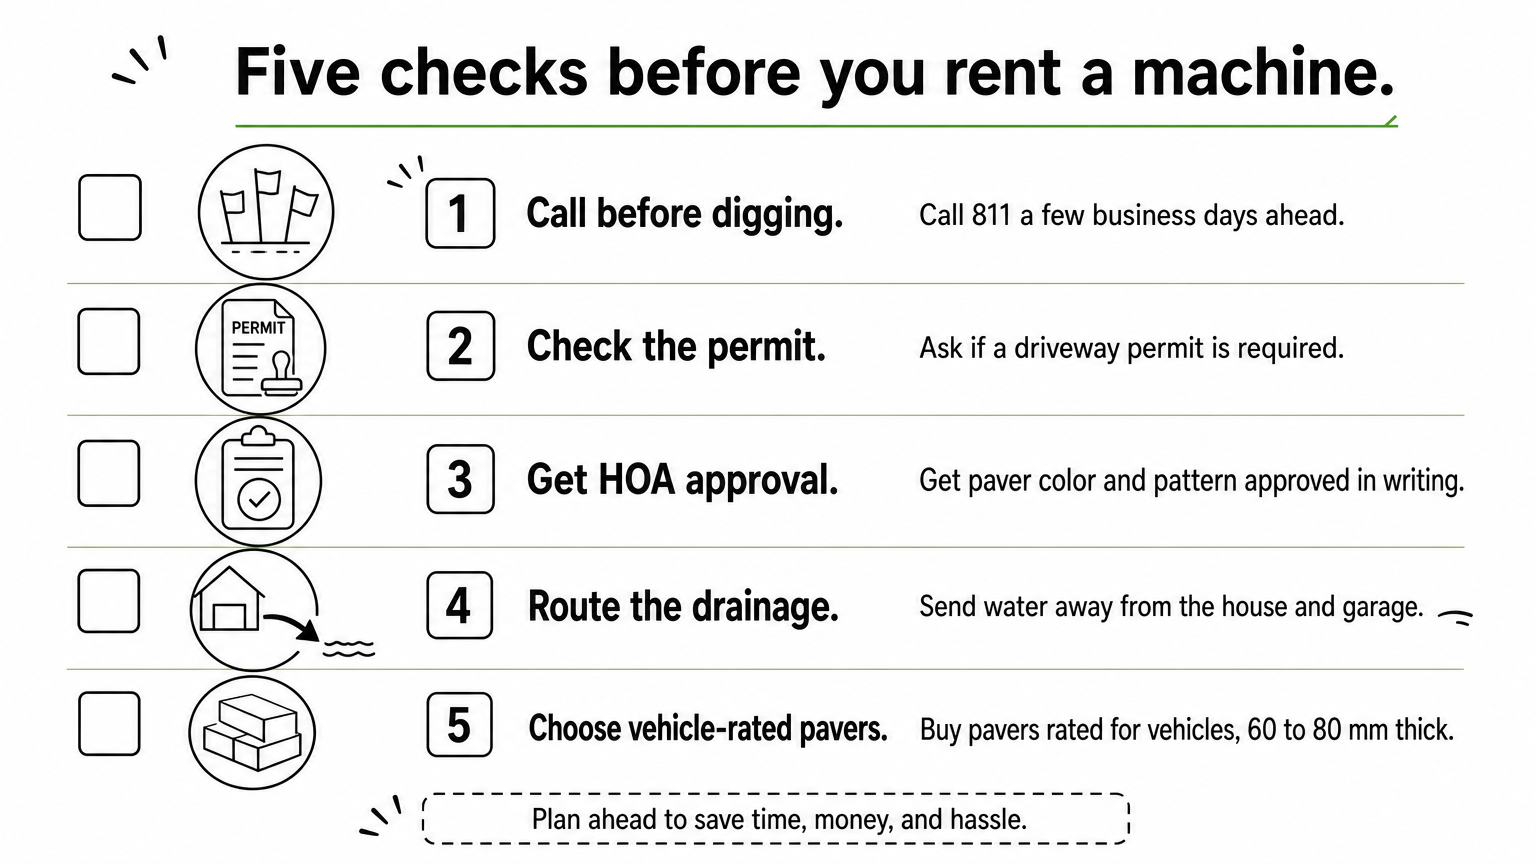
- Utilities: Call 811 (Sunshine 811 in Florida) a few business days ahead so buried lines are marked. Never excavate on a guess.
- Permits: Ask your city or county building department whether a driveway permit is required. The apron where the driveway meets the road is often public right-of-way with its own rules.
- HOA approval: If you have an association, get paver color and pattern approved in writing.
- Drainage: Decide where water will go. It must run away from the house and garage, not onto a neighbor's lot.
- Paver choice: Buy pavers rated for vehicles, typically 60 to 80 mm (about 2 3/8 to 3 1/8 inches) thick. Thin natural stone pavers sold for patios often cannot carry a car unless they sit on a concrete slab, so check the manufacturer's rating.
Settle utilities, permits and drainage before you rent a single machine, because every later step depends on them.
Tools and materials
Gather everything before day one, since a half-dug driveway left open to a storm is a problem.
- Tools: stakes, string line, marking paint, 4-foot level, 10-foot straightedge, shovels, rakes, wheelbarrow, hand tamper, rubber mallet, two 1-inch pipes for screed guides, a straight 2x4, push broom, wet saw or dust-controlled cut-off saw, and a plate compactor. For anything beyond a small area, add a skid steer or mini excavator.
- Materials: base aggregate, coarse bedding sand, pavers, edge restraint with 12-inch spikes, joint sand, and geotextile fabric for soft soil.
- Safety gear: gloves, eye and hearing protection, and a respirator when cutting pavers.
Step 1. Mark out and excavate to the right depth
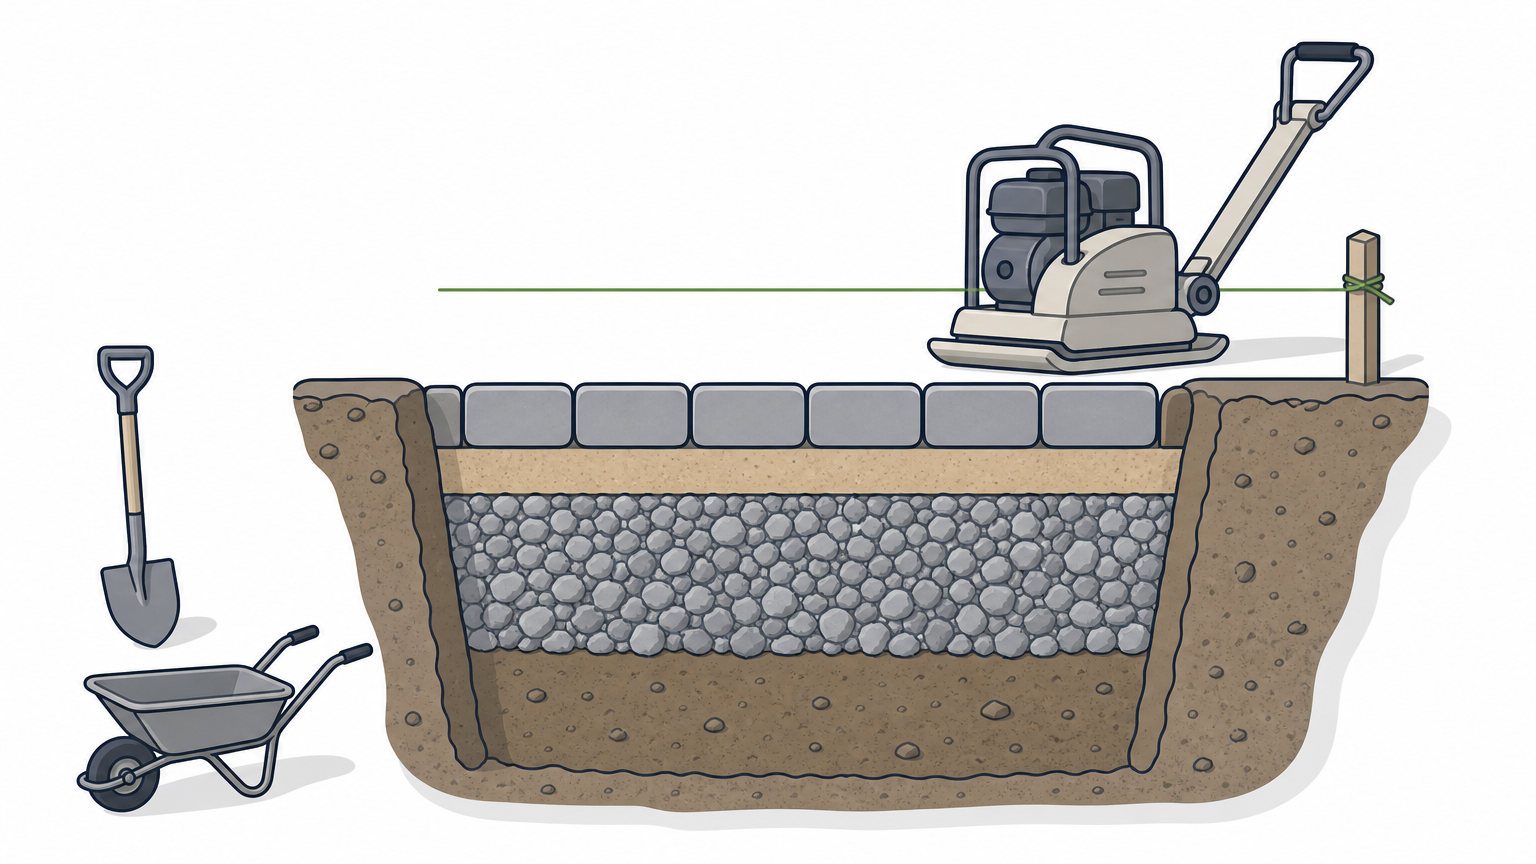
Excavation depth equals the base thickness plus 1 inch of bedding sand plus the paver thickness. For most residential driveways that totals about 12 inches. Pavers never go straight on dirt.
Lay out the footprint and set the slope
Stake the outline and run string lines at the finished surface height. A one-car driveway is commonly 10 to 12 feet wide and a two-car driveway 18 to 24 feet. Plan to excavate 6 to 8 inches beyond the paved edge so the base extends past the pavers and gives your edge restraint something solid to sit on.
Set the surface to fall about 1/4 inch per foot away from the house and garage. It is far easier to build that slope into the string lines now than to correct it after the pavers are down.
Dig to depth and prepare the subgrade
Strip topsoil, roots and anything organic until you reach firm soil. If you are asking how to install driveway pavers over dirt, this is the answer: you remove the dirt layer that moves and build a base on the firm soil beneath. Compact that exposed subgrade with the plate compactor. Dig out any spot that stays soft or bounces underfoot and refill it with compacted stone.
Base depth depends on soil and load:
| Condition | Base depth | Notes |
|---|---|---|
| Firm, well-drained soil, passenger cars | About 8 in | Typical residential minimum |
| Soft, clayey or wet soil, or heavier vehicles | 10 to 12 in | Add geotextile fabric |
| Permeable system | Plan on 15 in or more total excavation | Soil must drain well |
Worked example: 20 by 30 foot driveway
The paved area is 600 square feet. With a 6-inch extension on each side, the dig footprint is 21 by 31 feet, or 651 square feet. Using an 8-inch base and 80 mm (3 1/8 inch) pavers, total depth is 8 + 1 + 3 1/8 = 12 1/8 inches.
| Item | Quantity |
|---|---|
| Soil to remove (651 sq ft at 12 1/8 in) | About 24 cubic yards |
| Base stone, compacted (651 sq ft at 8 in) | About 16 cubic yards; order about 18 |
| Bedding sand (600 sq ft at 1 in) | About 1.9 cubic yards; order 2 |
| Pavers | 630 to 660 sq ft (5 to 10% extra for cuts) |
Dig for the base you need, not the pavers you see: total depth is base plus 1 inch of sand plus paver thickness.
Step 2. Build and compact the subbase
The subbase is the compacted crushed stone layer that carries the load, and it is built in lifts of 3 to 4 inches, each compacted before the next goes down. This is the layer that decides whether your driveway stays flat.
What goes under driveway pavers
From the bottom up, the layers are compacted subgrade, optional geotextile on soft soil, base stone, bedding sand, then pavers. You have two main base systems:
| System | Base stone | Bedding | Trade-offs |
|---|---|---|---|
| Dense-graded (traditional) | 5/8-inch minus road base (ASTM D 2940) | Coarse sand | Time-tested, drains slower, needs heavy compaction |
| Open-graded (permeable) | 3/4-inch clear or ASTM No. 57 stone | 1/4-inch chip (ASTM No. 9) | Less compaction, drains well, materials cost slightly more |
Local suppliers sell regional equivalents of dense-graded base, so ask what they stock and confirm it is a compactable, well-graded product. The permeable system only works where the soil beneath can absorb water.
Place and compact each lift
Work through the base in this order:
- Compact the subgrade and, on soft soil, lay geotextile fabric across it and up any vertical soil faces.
- Spread the first lift of 3 to 4 inches and rake it level.
- Lightly dampen dense-graded stone, which compacts better when slightly moist.
- Make at least three passes with a reversible plate compactor (a driving force around 10,000 lb is a good rental target), changing direction between passes.
- Repeat lift by lift until the base surface sits 1 inch plus the paver thickness below your finished grade.
- Rake and screed the final surface to the slope, then check it with string lines and a 10-foot straightedge. Aim for no more than about 3/8 inch of deviation.
A finished base should feel like pavement underfoot. If your boot leaves a print, keep compacting.
Thin, well-compacted lifts beat one thick layer every time, because a deep pile of loose stone never compacts at the bottom.
Step 3. Screed the bedding layer and lay the pavers
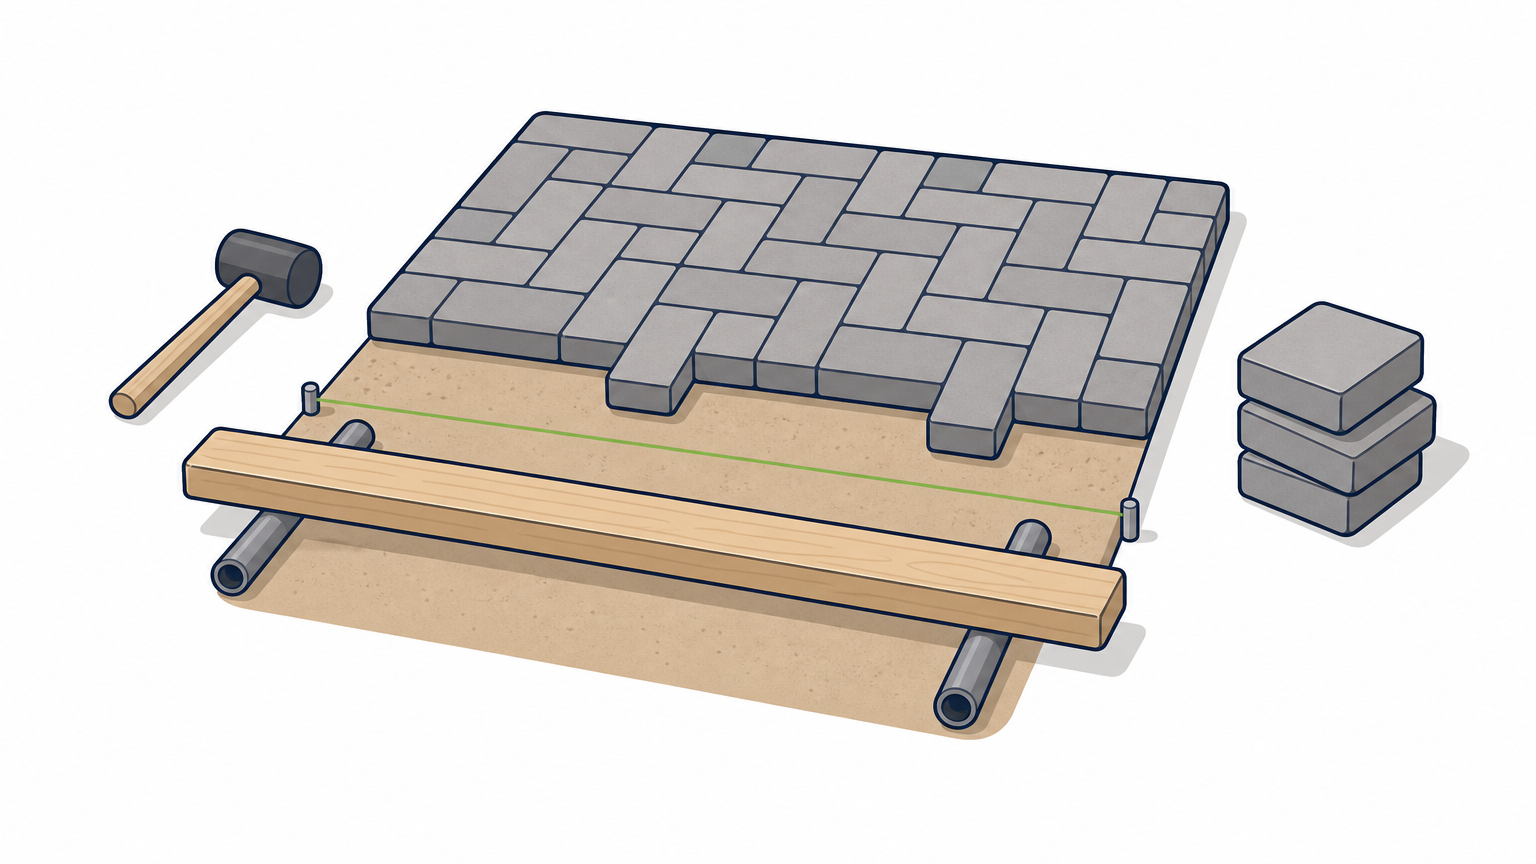
The bedding layer is a 1-inch bed of coarse sand, screeded flat and left untouched until pavers cover it. Pavers go down from a fixed straight edge, tight and square, working from the surface you have already laid.
Screed the bedding layer
Use coarse, washed concrete sand . Do not use mason's sand, limestone screenings or slag, because their fines hold water and the surface will rut. Lay two 1-inch pipes on the base about 6 feet apart as screed guides. Fill between them and pull a straight 2x4 across the pipes. Then remove the pipes, fill the grooves with a trowel, and do not walk on the bed again.
Set the guides slightly proud of your final grade, since sand settles when you compact the pavers. A half inch is the usual allowance for sand bedding. Screed only as much area as you can pave that day, and cover it if rain is coming. On an open-graded base, use 1/4-inch chip as the bedding instead of sand.
Lay the pavers
Start at a fixed straight edge, such as the garage slab or a string line, and check it is square with a 3-4-5 triangle. Starting at the garage perpendicular to the house also avoids thin sliver cuts where the driveway meets the slab. A herringbone pattern is the strongest choice for driveways because the interlock resists shifting under braking and turning.
Set each paver straight down onto the sand. Never slide it, which pushes the bed out of level. Keep joints tight and consistent, using the paver's spacer nibs where it has them. Draw from several pallets at once to blend color. Check alignment against string lines every few rows, and snap a chalk line on the sand if needed.
Cut pavers safely
Nearly every driveway needs cuts along edges and around drains. Lay all the full pavers first, mark the gaps, and cut with a wet saw or a saw with dust control. Cutting masonry dry creates silica dust, so wear eye, hand and lung protection. Save offcuts for other gaps to reduce waste.
Work from the pavers you have already set and never step on the screeded sand.
Step 4. Restrain the edges and lock in the joints
Edge restraints keep the pavers from spreading under traffic, and every edge needs one. After the restraints go in, you compact the surface and sweep joint sand into every seam.
Install edge restraints
The street apron and garage slab often act as restraint on two sides. The remaining sides need one of these:
| Type | Best for | Key points |
|---|---|---|
| Concrete curb | Maximum strength | Expensive, hard to position precisely; reinforce with two 5/8-inch rebar, support the outer edge with turf |
| Plastic edging | Fast, practical installs | Use a quality product, set on the base (not the bedding), tight to the pavers, spiked with 12-inch spikes |
| Reinforced mortar edge | Curves and most layouts | Troweled on the base using a fiberglass-reinforced mix |
Install restraints before compacting. Pavers that are free to creep outward will open joints and lose their lock.
Compact and fill the joints
Sweep the surface clean first. Never put sand in the joints before compaction, since it prevents leveling and can scuff the pavers. Then run the plate compactor over the whole surface in at least three passes, varying direction . Fit the plate with a polyurethane pad, or use a roller, to protect the finish. Replace any cracked or chipped pavers now.
Next, sweep in joint sand. Polymeric sand is the most popular choice because it hardens when wetted and resists weeds, erosion and insects. Choose a dry day and follow the label exactly. Fill until the sand sits about 1/8 inch below the paver chamfer. Remove all dust from the surface before you mist it, because dust left on top bonds into a hazy film. Central Florida's afternoon storms can wash out fresh polymeric sand, so check the forecast, then keep traffic off for the time the label specifies.
Seal and maintain
Sealing is optional. Some owners want the richer color and added stain protection, especially on high-traffic driveways. TWQ offers paver sealing for both new and older pavers.
Whether you seal or not, sweep the surface regularly and top up joint sand when it drops. Replace any paver that settles or cracks right away so one low spot does not spread.
Where to go from here
A paver driveway holds up when the layers under it are right: about 12 inches of excavation, an 8-inch compacted base built in thin lifts, 1 inch of screeded sand, vehicle-rated pavers in herringbone, restrained edges, and joints locked with sand. Get those in order and the surface will stay flat for years.
If the scale, the equipment or the weekends are more than you want to take on, TWQ builds paver driveways for homeowners in Sebring, Lake Placid, Avon Park and the surrounding Central Florida area. You can request a free estimate for your paver driveway from TWQ and we will schedule a walkthrough of your property before writing it up.