
How to Install Patio Pavers: a Step-by-Step Guide
You want a patio that stays flat, drains right, and doesn't heave after one Central Florida rainy season. That's exactly what a proper patio paver installation delivers when the ground prep and base work get done correctly the first time. Most DIY patios fail because someone skipped the compaction step or skimped on base depth, not because the pavers themselves were low quality.
This guide walks you through the real process, the same one our crews use on residential jobs around Sebring, Lake Placid, and Avon Park. You'll get the paver installation steps in order: excavation, base material, edge restraints, sand setting bed, and laying pattern, plus the compaction details that separate a patio that lasts 20 years from one that sinks in two.
Whether you're working with concrete pavers, natural stone, or interlocking blocks, the fundamentals don't change. We'll cover ground preparation and drainage planning first, since that's where most projects succeed or fail, then move into base materials, laying technique, and the finishing touches like joint sand and sealing. If your project turns out bigger or more complex than expected, that's usually the point where calling in a hardscape crew saves you time and money.
What to know before you start installing pavers
Before you rent a plate compactor or order a pallet of pavers, get a few fundamentals straight. A paver patio installation that lasts decades depends on decisions you make before you dig the first shovelful, not on the pavers you eventually choose. Skipping this planning stage is the number one reason DIY patios crack, sink, or pool water within a year or two.
Call before you dig
Contact 811 or your state's one-call service at least a few business days before excavation. Underground utility lines, irrigation pipes, and septic components hide closer to the surface than most homeowners expect, and hitting one turns a weekend project into an expensive repair. Check with your county or city about permit requirements too. Sebring and most Central Florida municipalities don't typically require permits for a standalone patio under a certain square footage, but attached structures, drainage changes near property lines, or anything tied to a septic drain field can trigger review. A quick call to your local building department saves you from tearing out finished work later.
A patio that lasts starts with what happens underground, not with the pavers on top.
Tools and materials you'll need
Having the right equipment on site before you start keeps the job moving and prevents shortcuts born out of frustration halfway through.
- Flat shovels, a mattock, and a garden rake for excavation and grading
- A plate compactor (rent one, don't skip this) for base and paver compaction
- A laser level or a long straight board with a bubble level for grading
- Landscape fabric to separate soil from base material
- Crushed limerock or graded aggregate for the base layer
- Coarse concrete sand for the bedding layer
- A screed board and two screed pipes (rigid conduit works well)
- A rubber mallet and a wet saw or angle grinder with a diamond blade for cutting pavers
- Edge restraints and spikes
- Polymeric sand for the joints
Renting a plate compactor typically runs $60 to $100 a day, and it's not optional. Hand-tamping never achieves the density a paver blocks installation needs to resist settling.
Reading your soil and drainage needs
Central Florida sits mostly on sandy soil, which drains well but compacts less predictably than clay-heavy soils up north. That sand base is actually a plus for patio stone paver installation , since it drains fast during our summer downpours, but it also means you need a consistent, well-compacted aggregate base to keep pavers from shifting as sand settles unevenly underneath. If your yard has patches of heavier fill dirt or organic topsoil where a tree once stood, expect uneven settling unless you excavate deeper in those spots and rebuild the base to match the surrounding grade.
Drainage planning matters just as much as the base itself. Plan for a slope of about 1/4 inch per foot away from your house or any structure. On a 12-foot-deep patio, that's a 3-inch drop from the house side to the outer edge. Skip this and you'll be staring at standing water after every afternoon thunderstorm.
Picking your window and knowing your limits
Schedule the work for a stretch of dry weather. Wet base material won't compact properly, and freshly laid sand turns to soup in a downpour. Late fall through spring tends to give Central Florida the driest stretch of consecutive days, though you can work through summer if you watch the forecast closely.
Finally, be honest about scope. A small 100 to 150 square foot patio is a manageable weekend-plus project for one or two people. Anything larger, or any project involving a paver deck installation on uneven terrain, retaining wall work, or drainage tie-ins, is where hiring a professional hardscape crew pays for itself in avoided mistakes.
Step 1. Plan your layout and calculate materials
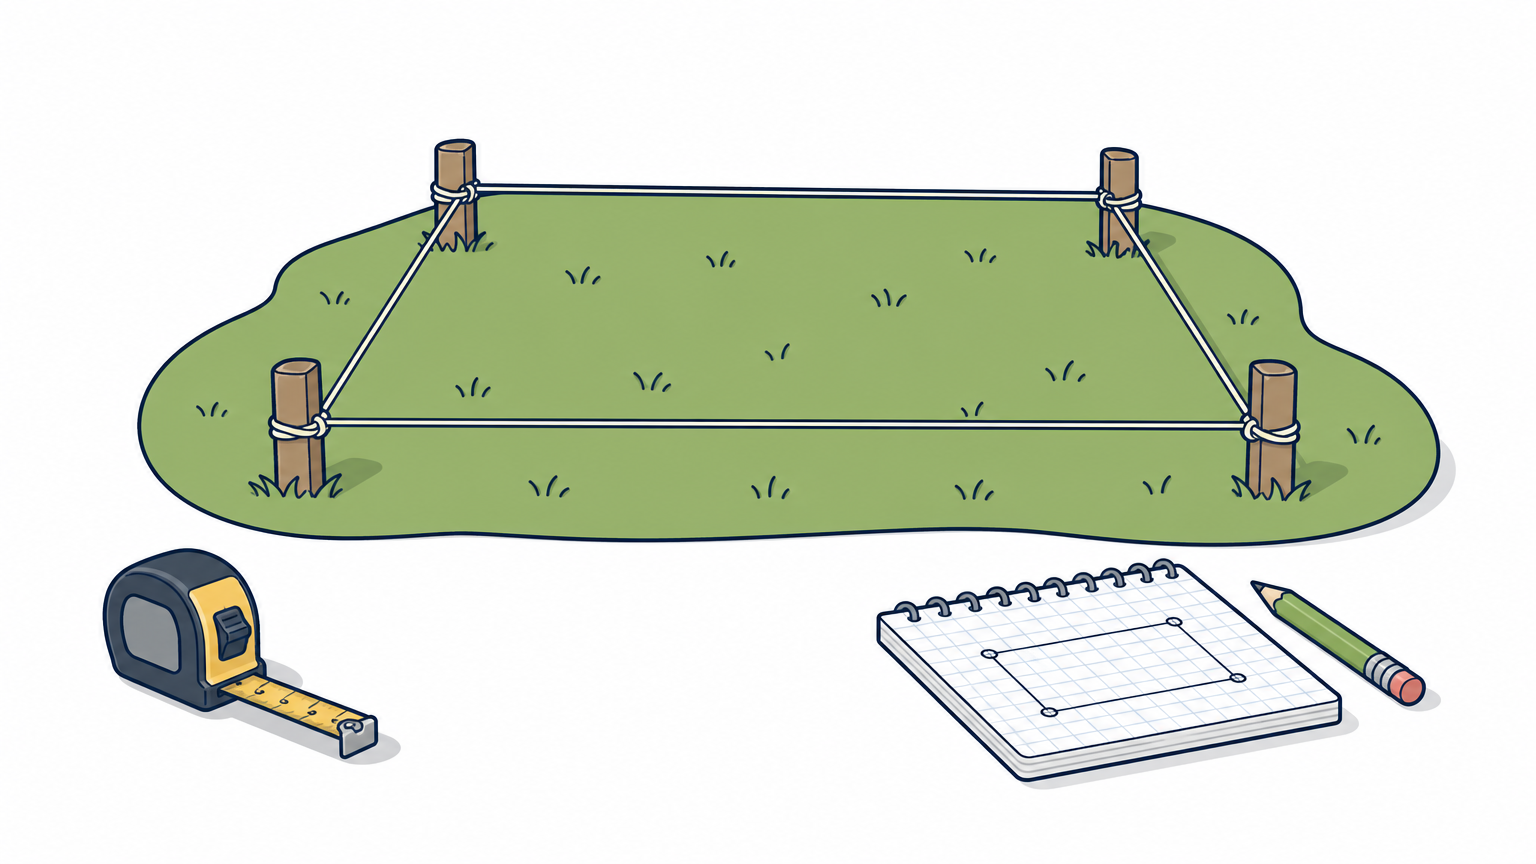
Grab a tape measure, some graph paper, and stakes before you touch a shovel. Marking out your patio layout on the actual ground with stakes and mason's string gives you a real sense of scale that a sketch on paper never quite captures. Walk the space, check sightlines from your kitchen window or back door, and confirm the patio clears any septic lines, tree roots, or utility easements you found during your 811 call.
Sketch the shape and set your dimensions
Simple rectangles and squares are the easiest shapes for a first paver patio installation , since they minimize cuts and waste. Curved edges or multi-level designs, like the ones in our paver project gallery, look great but add complexity and cutting time that can double your labor on a first attempt. Once you've settled on a shape, measure the length and width in feet, then multiply to get your total square footage. Add 5 to 10 percent to that number to cover breakage, miscuts, and pattern waste, especially if you're going with a herringbone or basketweave layout instead of a simple running bond.
Measure twice, order once. Material shortages mid-project cost more in delays than the extra pallet ever would.
Calculate your base, sand, and paver quantities
Every layer of a concrete paver patio installation needs its own quantity calculation, and shorting any one of them undermines the whole structure. Use this rough guide for a standard residential patio:
| Material | Depth needed | Coverage estimate |
|---|---|---|
| Crushed limerock/aggregate base | 4 to 6 inches (compacted) | Roughly 0.5 tons per 100 sq ft, per inch of depth |
| Coarse concrete sand (bedding) | 1 inch (compacted) | Roughly 0.33 tons per 100 sq ft |
| Pavers | Per manufacturer thickness | Total sq ft plus 5-10% waste |
| Polymeric sand | Joint fill | 1 bag (50 lb) per 80-100 sq ft, average |
| Edge restraints | Perimeter length | Measure full perimeter, add 10% for corners |
Quantities shift depending on soil conditions and paver thickness, so confirm numbers with your supplier before ordering. Suppliers around Sebring and Lake Placid can usually deliver aggregate and sand in bulk, which costs less per ton than bagged material once your patio passes 150 square feet.
Finally, order everything at once rather than in batches. Paver dye lots vary slightly between production runs, and running out mid-project often means a visible color mismatch when the new batch arrives.
Step 2. Excavate and grade the patio area
Excavation is where your paver installation steps turn from planning into physical work, and it's also where most first-time DIYers underestimate the labor. Digging out a 200 square foot patio to a proper depth means moving several tons of soil, so line up help or a rented mini excavator if you're working alone. Get this depth wrong and every layer above it, base, sand, and pavers, ends up either too high or too shallow to hold up over time.
Calculate your total excavation depth
Add up the thickness of every layer that will sit below your finished paver surface: 4 to 6 inches of compacted aggregate base, 1 inch of compacted bedding sand, and the thickness of your paver itself, typically 1.5 to 2.375 inches. A standard patio stone paver installation using 6-inch base and 2.375-inch pavers needs roughly 9.5 inches of total excavation depth. Dig a few inches deeper than that number to give yourself margin for grading errors, since it's much easier to add fill back than to re-dig a finished hole.
Remove sod, roots, and soft spots
Strip the sod and topsoil first, working a few inches past your string lines on every side to give yourself room for edge restraints later. Watch for tree roots, since cutting through a large one can destabilize a nearby tree and create a soft spot that settles unevenly under your patio. Any pockets of loose fill dirt, old mulch, or organic material need to come out entirely and get replaced with compacted subgrade, or that spot will sink within a season regardless of how well you build the layers above it.
Grade the subgrade for slope
Compact the exposed subgrade with your plate compactor before adding any base material. This step gets skipped constantly, and it's why patios settle unevenly a year or two after installation. Use your laser level or a string line with a line level to check that your slope runs consistently at about 1/4 inch per foot, sloping away from the house toward the drainage direction you planned earlier.
A patio only drains as well as the ground it's built on, so grade the dirt before you ever touch a paver.
Check the slope in multiple spots across the patio, not just at the corners, since low spots in the middle of a paver deck installation are just as likely to collect standing water as a poorly graded edge. If your subgrade check reveals a low spot, fill it with compactible fill dirt and re-tamp rather than trying to fix it later with extra sand, which compresses unevenly under foot traffic and vehicle weight.
Step 3. Install and compact the paver base
Base material is the layer that actually carries the weight of your patio, and it's the single biggest factor separating a paver installation that holds up for decades from one that sinks by next summer. Crushed limerock or graded aggregate locks together under compaction to form a dense, load-bearing platform, while bedding sand only levels the surface for the pavers themselves. Confusing the two, or trying to skip straight to sand over loose dirt, is the fastest way to end up with a wavy, sunken patio within a year.
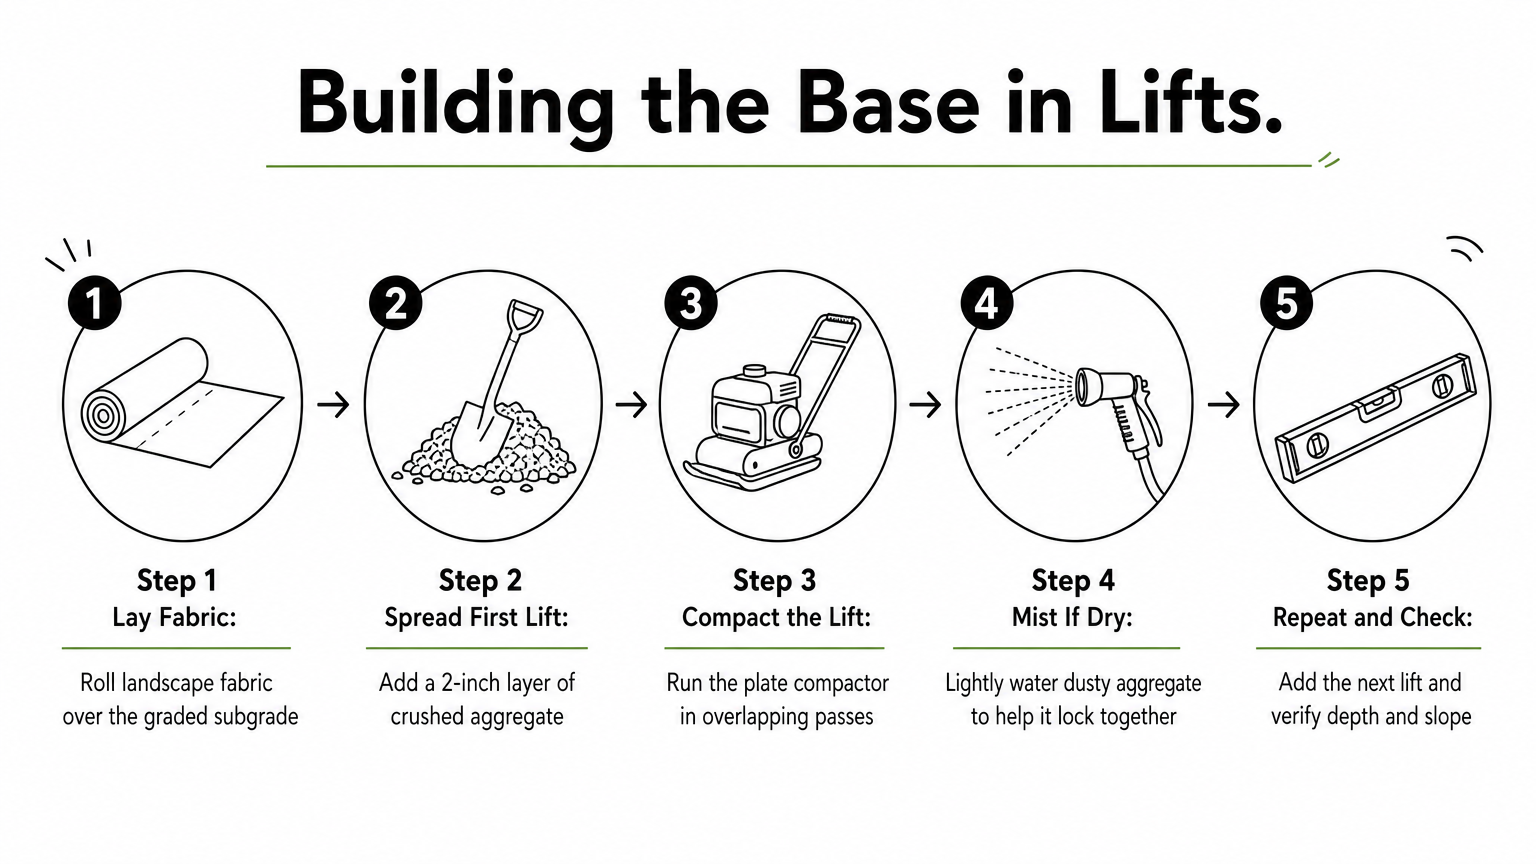
Lay landscape fabric first
Roll landscape fabric across the entire graded subgrade before any aggregate goes down, overlapping seams by at least 6 inches. This fabric keeps native soil from migrating up into your base material over time, which prevents the slow, uneven settling that shows up as dips and low spots years later. Skip this step on sandy Central Florida lots and you're inviting exactly the kind of shifting that undermines a paver stone patio installation from underneath, invisibly, long after the project looks finished.
Add and compact aggregate in lifts
Spread your crushed aggregate in layers, or lifts, of no more than 2 inches at a time rather than dumping the full 4 to 6 inches at once. Each lift needs its own pass with the plate compactor before you add the next:
- Spread the first 2-inch lift evenly across the fabric with a rake
- Run the plate compactor over it in overlapping passes, working in both directions
- Mist lightly with water if the material feels dry and dusty, since slight moisture helps particles lock together
- Add the next lift and repeat until you reach your target compacted depth
Compacting in thin lifts matters more than most DIYers expect. A single pass over 6 inches of loose aggregate only compresses the top few inches, leaving a soft, uncompacted layer underneath that will settle unevenly under foot traffic.
A base that isn't compacted in lifts isn't compacted at all, it just looks that way until the first rainy season.
Check depth and slope again
After your final lift, verify both the depth and the slope before moving forward. Run your laser level or string line across the compacted base to confirm it still holds that 1/4 inch per foot drop away from the house. A concrete paver patio installation depends on this base staying true to grade, since bedding sand can't correct a sloped or uneven aggregate layer underneath it. Walk the entire surface and press firmly with your foot in several spots. Any give or softness means that section needs more compaction before you screed the sand.
Step 4. Screed the bedding sand
With your base compacted and true to grade, it's time to lay down the bedding layer that pavers actually rest on. Coarse concrete sand, not play sand or masonry sand, gives you a layer that drains well and doesn't wash out from underneath your pavers after a heavy Central Florida storm. This step in any paver installation is where you set the final surface level, so precision here saves you from chasing high and low spots once pavers are down.
Set your screed rails
Place two rigid pipes, often called screed rails, across the patio area parallel to each other, spaced a few feet apart depending on the length of your screed board. Set them on the compacted base so their tops sit exactly one inch above the base surface, which is your target compacted sand depth. Check both rails with a level to confirm they match the slope you established earlier, roughly 1/4 inch per foot away from the house. Any inconsistency between the rails transfers straight into your paver surface later.
Get the screed rails wrong and every paver you lay afterward inherits that mistake.
Dump and screed the sand
Pour sand between the rails in a loose, even layer slightly higher than the rail tops, then drag a straight screed board across both rails to strike off the excess. Work in short sections rather than trying to screed the whole patio at once, since sand shifts and settles the moment you kneel or step near it. Pull the board toward you in a slight sawing motion for a cleaner, more consistent surface. Once a section is screeded, don't walk on it. Footprints compress the sand unevenly and create low spots that show up as dips once the pavers are set.
Fill in the rail tracks
After screeding each section, carefully remove the rails and fill the shallow tracks they leave behind with loose sand, smoothing it level by hand or with a small trowel. This detail matters more than it looks. Skipping it leaves two long grooves running through your base, and pavers set over them will settle slightly lower along those lines. Once the tracks are filled, the bedding layer is ready, and you should have roughly one inch of loose, uncompacted sand across the entire patio footprint, never compacted before pavers go down since compaction happens after they're laid.
Getting a paver stone patio installation to this stage means the hardest, least visible work is behind you. Everything from here builds directly on how flat and consistent this sand layer turned out.
Step 5. Lay the pavers
With the bedding sand screeded and the tracks filled, you're ready for the part of a patio paver installation that actually looks like progress. Start at a fixed corner, ideally where two straight edges meet against a house wall or existing structure, and work outward in the pattern you chose during layout. Never lay pavers by walking backward across the finished sand bed. Every step you take on unset pavers or bare sand undoes the flat surface you just spent an hour screeding.
Start in a corner and work outward
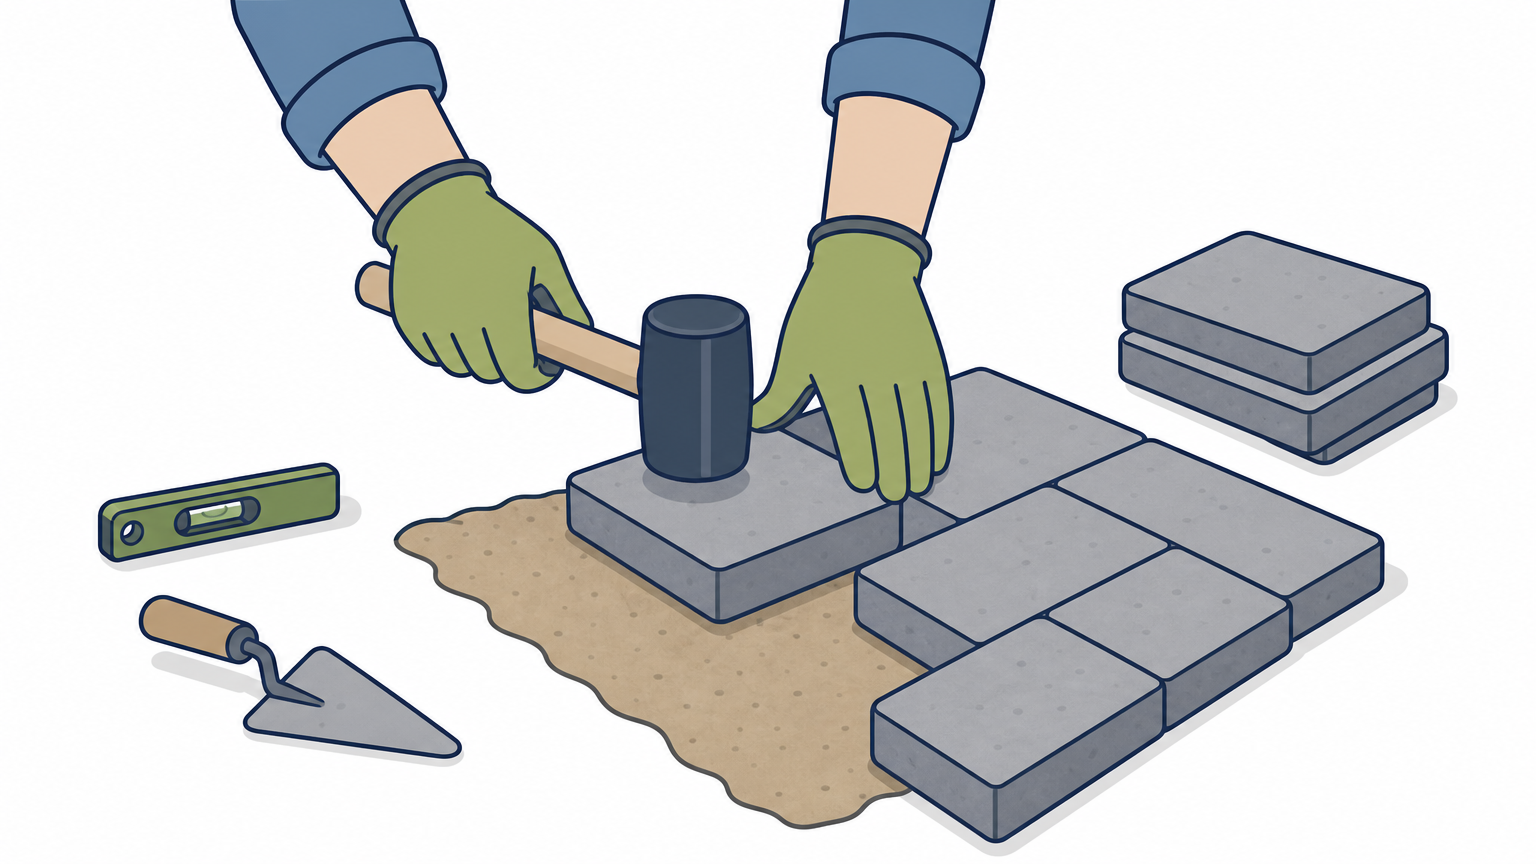
Set your first paver tight into the corner and use it as your reference point for every following piece. Lay full pavers first across the entire field, saving cuts along the edges for last. This keeps your pattern lines straight and gives you a stable, walkable surface to kneel on as you move outward. Working from a fixed reference point matters more in a paver stone patio installation than most people expect, since even a small drift in the first few rows compounds into a visibly crooked pattern by the time you reach the far edge.
Lay from a fixed point and work outward. Drift in the first row becomes a crooked patio by the last one.
Maintain consistent joint spacing
Most concrete pavers include small spacer nubs molded into the edges, so butting them together naturally creates a joint of about 1/8 to 3/16 inch. Natural stone and some architectural pavers lack these nubs, so use plastic spacers or a consistent visual gauge to keep every joint even. Uneven joints aren't just cosmetic. They throw off your final layout dimensions, which matters when you're setting up cuts and edge restraints later.
Set pavers with a mallet, not by dragging
Drop each paver into place from a slight height rather than sliding it across the sand, then tap it level with a rubber mallet. Dragging pavers pushes sand into ridges ahead of the piece and creates gaps in the bedding layer underneath. Check every few rows with a level laid across multiple pavers, not just one at a time, since a slight lean can hide when you're only checking a single unit.
Stop periodically and stand back to check the whole field for consistency. Small errors are easy to fix now with a mallet tap or a lift-and-reset. Once you've compacted the surface and filled the joints, correcting a low paver means pulling it back out entirely.
Step 6. Cut pavers and set edge restraints
Once the full field of pavers is down, you're left with gaps along the perimeter that need cut pieces to fill. This part of a paver installation takes patience, since rushed cuts leave visible gaps that fill with debris and let edge pavers shift over time. Measure each gap individually rather than assuming they're uniform, since even a well-planned layout drifts slightly by the time it reaches the edges.
Mark and cut pavers accurately
Set the paver you're about to cut directly into its gap, overlapping the neighboring piece, and trace the cut line with a pencil or chalk using the adjacent paver's edge as your guide. This method is faster and more accurate than measuring with a tape for every single cut. Cut with a wet saw fitted with a diamond blade for clean edges and minimal dust, or use an angle grinder with a diamond blade if you're only making a handful of cuts. Wet saws produce a straighter, smoother edge, which matters most on cuts that will sit at eye level along a patio's front border.
A crooked cut paver stands out more than any other mistake in the whole patio, so slow down on this step.
Set edge restraints around the perimeter
Edge restraints lock the outer row of pavers in place and stop the whole field from spreading outward under foot traffic, especially on sandy Central Florida soil where lateral movement happens faster than on denser clay. Install rigid plastic or aluminum restraints flush against the outer edge of your perimeter pavers, driving spikes through the pre-drilled holes every 8 to 12 inches.
| Restraint type | Best use | Typical cost per linear foot |
|---|---|---|
| Plastic paver edging | Standard residential patios, budget-friendly | $1 to $3 |
| Aluminum edging | Curved layouts, higher durability | $3 to $6 |
| Concrete curbing | Commercial or heavy-traffic areas | $8 to $15 |
For most residential paver deck installation projects, plastic or aluminum edging holds up fine as long as the spikes go into compacted subgrade, not loose fill. Skipping restraints entirely, or relying on soil alone to hold pavers in place, is one of the most common reasons a patio starts spreading at the edges within its first year.
Backfill against the outside of the restraints with soil or sod once they're anchored, tamping lightly to close any gap between the restraint and the surrounding yard. This final touch hides the hardware completely and gives your patio stone paver installation a finished, intentional look right out to the edge.
Step 7. Fill the joints, seal, and maintain your patio
Once every paver sits level and every edge restraint is anchored, you're ready for the step that locks the whole surface together. Filling the joints properly is what turns a field of loose stones into a single, unified patio surface that resists shifting, weeds, and ant colonies setting up shop between the cracks.
Sweep in polymeric sand
Spread polymeric sand across the dry paver surface and work it into every joint with a stiff push broom, sweeping in multiple directions to make sure sand packs all the way to the bottom rather than bridging near the top. Run the plate compactor over the entire patio once the joints are full, which seats the pavers into their final position and drives sand deeper into any gaps the broom missed. Sweep off excess sand from the paver faces afterward, since leftover residue hazes over once it gets wet and looks like a cloudy film on your finished patio paver installation .
A joint that isn't fully packed with sand is a joint waiting to grow weeds by next spring.
Mist the surface lightly with water in a fine spray, following the manufacturer's directions on your polymeric sand bag closely. Too much water washes sand back out of the joints before it cures; too little leaves it soft and prone to erosion in the first hard rain. Let the patio cure for 24 to 48 hours without foot traffic before you call the joints finished.
Decide whether to seal
Sealing your pavers isn't mandatory, but it does two things well: it deepens paver color and it adds a layer of protection against staining from grease, tannins, and rust. Weigh the tradeoffs before committing:
| Consideration | Sealed | Unsealed |
|---|---|---|
| Color and sheen | Deeper, more saturated | Natural, matte |
| Stain resistance | Higher | Lower |
| Reapplication | Every 3-5 years | None needed |
| Upfront cost | Adds $1-2 per sq ft | None |
Apply sealer only after the joint sand has fully cured, and choose a breathable, penetrating sealer rather than a film-forming one, since Central Florida's humidity traps moisture under coatings that don't let vapor escape.
Keep it looking new
Rinse the surface a few times a year, or give it a periodic pressure wash, to clear pollen and organic buildup, and top off joint sand wherever it settles or washes out. Watch for weeds pushing up along the edges near your restraints, since that's usually the first sign sand has thinned in that spot. If your patio sits within a larger yard that already gets regular attention, folding it into an ongoing landscape upkeep schedule keeps small issues from turning into re-sanding jobs down the road.
From bare ground to a finished patio
Seven steps stand between a patch of bare dirt and a patio that holds up for decades: planning, excavation, base compaction, sand screeding, laying, edge work, and joint fill. Skip none of them, and rush none of them either. Every failed patio paver installation we've been called to fix traces back to one shortcut, usually thin base depth or skipped compaction, that seemed harmless on installation day and showed up as a sunken corner a year later.
Doing this work yourself is entirely possible if you've got a weekend, some patience, and a rented plate compactor. But once the square footage climbs past what two people can dig and compact in a couple of days, or your yard throws in slopes, tree roots, and drainage tie-ins, the math shifts toward hiring it out. If you'd rather skip straight to the finished patio without the sore back, ask our TWQ crew about professional paver patio installation in Sebring and we'll handle the ground prep, base, and pavers right the first time.